I have been crafting like crazy here lately! This year I have participating in a few challenges in just a short amount of time, planned out a YT hop for My Shop Wicked Designs, set up a new DT and sent out goody boxes/envies, made some gifts for family and friends, worked on my nephews b-day gift, drew up some more digis for future releases...
Oh my gosh not to mention being a full time mom, and wife with all those fun duties! XD lol yes my kids are 18 and 17 they do not need my every thread of attention, but they still require me and my time. So I have been sooooo caught up with all these ideas swimming in my head that I have stepped into the land of chaos and disorder lol and have also fallin under the weather to boot! :0(
I do have a couple pre-recorded videos that I will be putting up on YT here and there and maybe some pics to fill the empty space...hahaha So this way I have a chance to rest and relax and also maybe get myself scheduled and organized I got my planner ready and some fun crafty goodness too, just to stay busy as well as loads of YT videos to catch up on!
I have too many ideas swimming around and I need to get back into jotting them down so I do not burn myself out! That is what happened, not that I burnt myself out just...became overwhelmed with all I had going on at once! I can multi-task but this was mama octopus times two! lol
I am going to take a short break and try to get myself a bit more organized and come back with a schedule. (hopefully that I can stick to haha)
I hope you all are well. Have a wonderful weekend! and of course Happy Crafting!
Showing posts with label misc. Show all posts
Showing posts with label misc. Show all posts
Friday, January 17, 2014

Wednesday, January 15, 2014
one piece Valentines goody box
I was thinking of making a smaller box to hold a few candies for some co-workers for my hubby for Valentines. I just made some for the kids so I had a little inspiration from those.
I came up with a one piece box that holds a little less candy but I can make in mass production!
Here is the box closed!


I came up with a one piece box that holds a little less candy but I can make in mass production!
Here is the box closed!
I used the same paper flowers to decorate the top! it has a slit the tab slides into to keep the box closed! I really like these little boxes they would be great for thank you gifts also!

here are the candies wrapped with scrap paper on the inside!

Only six nuggets fit, but for adults I figure that is plenty!
Off to finish the rest!
Happy Crafting!
Monday, January 13, 2014
Two piece Valentines Goody box
I wanted to make something simple for the kids in the family for Valentines Day!
We really don't do to much just a little something, so I thought a small box with a little candy would fit the bill!


We really don't do to much just a little something, so I thought a small box with a little candy would fit the bill!
Here is the box closed! I did a scalloped edge and added one of my paper flowers!
Super simple!

I wrapped some Hershey nuggets wrapped in scrap paper that matched!
Easy peasy...can you believe it holds 12 candies?

I think the kids will love these! Now to come up with an idea for co-workers maybe a smaller box...
Happy Crafting!
Wednesday, January 8, 2014
How do you keep your feet warm?
I don't know about you but my feet are always cold in the winter! No matter what i wear on my feet some slippers help for a little while and sometimes some don't! :0(
I decided I was going to make my own slippers! So I came up with a cross between a slipper and a bootie! They kind of end up looking almost like socks! I do wear a pair of socks with these booties though it helps them hang on and stay a bit more insulated!
I love them...So does my daughter so I made her a pair also. I used double thread to make them, as I had no chunky yarn on hand and with the weather bring bad I was not venturing out to get some! haha so I made do!
Here is the result!
this one in blue and white is mine, they are so comfy I wear them all the time!


I have started a learn to crochet series on my YT channel would love for you all to join me and remember to subscribe! (LTC series)
have a great day, stay warm and happy crafting everyone!
I decided I was going to make my own slippers! So I came up with a cross between a slipper and a bootie! They kind of end up looking almost like socks! I do wear a pair of socks with these booties though it helps them hang on and stay a bit more insulated!
I love them...So does my daughter so I made her a pair also. I used double thread to make them, as I had no chunky yarn on hand and with the weather bring bad I was not venturing out to get some! haha so I made do!
Here is the result!
this one in blue and white is mine, they are so comfy I wear them all the time!
This is my daughters, and she wears hers all the time also.
I have to make some more masculine for my son and hubby once they pick their colors! these fit size 7-9 in ladies, but can be adjusted for other sizes.
hope you all like them! I do take special orders just message me!
I have started a learn to crochet series on my YT channel would love for you all to join me and remember to subscribe! (LTC series)
have a great day, stay warm and happy crafting everyone!
Tuesday, January 7, 2014
Personal Journal
I made a personal journal for 2014. just somewhere to write my thoughts and jot ideas! Something to keep on myself to take in my tote or purse. So naturally I did not want to heavy embellish it!
Take a look at my video of what I created!
Head to my YT channel Brendahdp77 to see it!
I would have posted the video here but the blog is having a bellyache! lol
Have a great day!
Take a look at my video of what I created!
Head to my YT channel Brendahdp77 to see it!
I would have posted the video here but the blog is having a bellyache! lol
Have a great day!
Wednesday, December 25, 2013
Recipe Mini I made
Hey everyone just wanted to share a project I made for my friend!
It was fun to make I used four by six recipe cards as my starting point and inspiration!
here are a few pics! I hope you like it!


It was fun to make I used four by six recipe cards as my starting point and inspiration!
here are a few pics! I hope you like it!
This is the front cover I wanted to add a little masculinity to it and a bit of each of the family! I had a blast coming up with a design plan for this mini!

Here is the first page I decorated the inside cover with small removable tags she can add titles or whatever she likes and the insert itself is a recipe card!

Here is a close up of the inside cover!

Every other page has a pocket on the back to store loose recipes hand written or pulled from a paper or magazine! The other pages have a butterfly with a tag, recipes will slip behind the butterfly as well.

This is the back of the album! I really think it turned out pretty cute! I am so happy that Daniela likes it!

Hope you all have a Merry Christmas and wonderful winter break!
Monday, December 23, 2013
Candy Wreath
Here is a wreath that I put together last night. I found some candy canes at the Dollar store that were cheap. I wanted to make some holiday decor that was a little different, and this is what I did!
It was super fast to make and turned out pretty nice.

It was super fast to make and turned out pretty nice.
Sorry about the lighting it was dark and I really wanted to get the picture taken before my camera died, lol!

I used watermelon candy canes so they were red and green and used some cardboard and scrappapers and a sticker in the center then I added some bling around the inner circle. Around the candy canes I added some ribbon and alternated with red foam present stickers that are glittered.
A pretty quick project to make and it looks cute on the wall!
Hope you all like it!
Sunday, December 22, 2013
a decorated gift box
I wanted to send a little something to my son for x mas since he was spending it with his dad. He didn't want me to send the bigger gifts so they will be waiting here for him when he comes back!
I wanted to make it a little special so I decorated all the flaps and put notes on all the goodies inside! I had to leave a couple unwrapped because they wouldn't fit inside if they were.
It was so much fun and I got to use up some scraps in the process! ;0) If I have time all my packages will be sent like this...I am going to try but I make no promises..lol
Well here is what i did!


I wanted to make it a little special so I decorated all the flaps and put notes on all the goodies inside! I had to leave a couple unwrapped because they wouldn't fit inside if they were.
It was so much fun and I got to use up some scraps in the process! ;0) If I have time all my packages will be sent like this...I am going to try but I make no promises..lol
Well here is what i did!
The completed box with all the yummy goodies!

A close up of all the yumminess! lol you can see all the little notes attached to each item! My son said that he really loved all the notes attached, that it really was the best. What can I say we work wonders for our children! lol
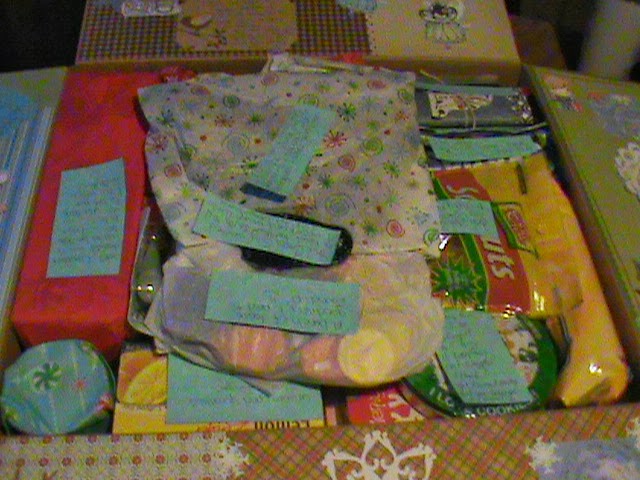
Here is the left flap! I used scrap papers mostly DCWV winter stack some images I had colored up! The bottom one in blue my daughter drew! The winter piece is a cut from my cricut.

Here is the top flap! I think it turned out cute! Again scraps and colored images plus each flap I add some tags if you follow them in order they tell a shortened reworked Christmas story! Twas the night before Christmas.

This is the bottom flap! I think this one may just be my favorite flap! Love it!

And here is the last flap the right side! Here the story ends and We have written a holiday message for him!
All in all instead of a card, the flaps do all the work! I really am happy with how this turned out!

This package will take him quite awhile to get through! It is packed full and messages on each one! I can not wait to hear from him! We may even facetime/skype while he opens it! lol That may be a long call! haha
I hope you all like it and it gives you some inspiration to dress up your packages to add that special touch! Happy Holidays Everyone!
Saturday, December 21, 2013
Flowers made from fiber scraps
I love to crochet so I have plenty of yarn scraps about and I wanted to use them...so here is what I have made.
Flowers two tone loopy ones! These are so pretty and fun to make!

Here is a close up of the red and black ones I have finished. put a center on and add them to any project...Love them I can not wait to use them in my projects.

These are the blues I made I think these will look awesome on christmas presents with some ribbon and a tag!

Hope you all likt them.
Tuesday, December 17, 2013
Knights hat!
Everywhere I looked to try to find a pattern for this hat for my son and hubby they wanted an unreasonable price and to have it made was crazy! I do not deny it takes time to create it...But come on lets be real people this hat 40 bucks lol anyway I have made more intricate hats that are worthy of 40 plus but this is so simple!!!
No I did not cave in and purchase a pattern nor did I waste money buying one! I simply drew up a sketch of what the real helms looked like and started my own pattern...now I'm sorry but the pattern is not for sale and I am not posting it either...I am however taking custom orders, but it will not be at their prices! Mine are fair, anyways All the ones I have seen offered are warm but not as warm as mine. I use the warmest stitch so it can be warn during the coldest times, if it is meant for role-play (LARP-ing) only then I will use a less warm stitch like they do.
I am not trying to knock to belittle the others making this kind of hat...But I do get a little heated when people really rip others off. I understand we need to make money but not this way...Uggg sorry I don't want to get started.
Anyways here is what I came up with! I love my pattern and so does every one who has seen the hat so far. I am so glad I did not cave mine was fairly inexpensive and quick to make.
I hope you all like it! It was fun to create and the warmth is awesome.

No I did not cave in and purchase a pattern nor did I waste money buying one! I simply drew up a sketch of what the real helms looked like and started my own pattern...now I'm sorry but the pattern is not for sale and I am not posting it either...I am however taking custom orders, but it will not be at their prices! Mine are fair, anyways All the ones I have seen offered are warm but not as warm as mine. I use the warmest stitch so it can be warn during the coldest times, if it is meant for role-play (LARP-ing) only then I will use a less warm stitch like they do.
I am not trying to knock to belittle the others making this kind of hat...But I do get a little heated when people really rip others off. I understand we need to make money but not this way...Uggg sorry I don't want to get started.
Anyways here is what I came up with! I love my pattern and so does every one who has seen the hat so far. I am so glad I did not cave mine was fairly inexpensive and quick to make.
I hope you all like it! It was fun to create and the warmth is awesome.

The face guard is removable, and it pivots up and down. It covers the nose mouth and chin, when you do not want it to cover your face it rests a top your forehead. Like a real knights Helm!
Know it is simple to add plumage but....If you are like me I did not want to hear SPARTA! over and over so Plumage this one has not lol!
Well , I hope you all like it and sorry for the rant!
Saturday, December 14, 2013
Match box ornaments
Matchboxes
I made each of these by hand and decorated them with scrap pappers and embellished them with my handmade paper flowers. I also added a ribbon hanger/pull to the drawer part with a eyelit.

Here is one up close I think it came out beautifully.

I weven lined the inside of the drawers so it all ties in and to make it a bit sturdier. I am using these as an advent calender of sorts they will hang on my tiny tree and hold tiny treats for the twelve days of christmas.

I hope you like them!
Tuesday, December 10, 2013
Boot cuffs
Boot cuffs!
These are great they block the downdraft of cold down your boot with out the bulk of boot socks, plus they are pretty! lol and all the rage right now!
I made three pairs for my nephews girlfriend for Christmas I hope she likes them!
I did this pair in a variegated yarn with cream, green, and pinkish browns. Super simple and they really do help keep you warm.

I made another set in browns and cream these go good with all your neutrals.

And of course black, white and grays for everything!

This way she can wear them with anything and have a pair that goes with every outfit!
I made the pattern myself, they are super fun and addictive to make!
Sunday, December 8, 2013
Earflap hat
Hey guys! I completed this brown and white ear flap hat for my Father for Christmas.
It is all done in single crochet. This is the first time I have ever made an earflap hat, I think it turned out pretty cute. I know my dad will like it!

Here is a close up of the stitches.

I have a list as long as Santa's it feels...lol so off I go to get more done to share with you all!
Have a great day!
Saturday, December 7, 2013
stocking stuffers???
Altered Candy Bars
These are great for all ages who doesn't like a little something sweet now and then?
I give these as gifts and also as stocking stuffers.
THey work up quick and are widely accepted and never turned down...
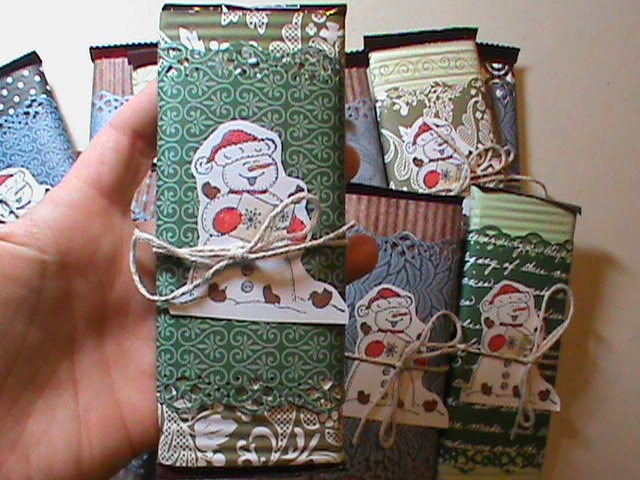
This year I went with a snowman caroling theme. I think they turned out cute.

Here is a close up! I just layered up some paper and ran it through the crimper and used my punches on the edges and colored and cut out the little snowman and tied a bit of twine around it and called it good. I really think they came out cute.
hope you have a great day!
Friday, December 6, 2013
Personal tissue holder!
Hey everyone!
I know it has been awhile since i posted on this blog, I have been really busy getting things made for some family and friends...Now I am here to start showing you all what I have been creating!
This I made for my sister well one of them, (I have four, 2 older and 2 younger).
I made this with acrylic worsted weight 4 ply yarn in white, black and teal. I added a satin ribbon in white for the closure.
I cut plastic canvas to size and did some embroidery stitches and this is what I came up with.
(I also sent one out to a good friend of mine but I never got around to filming or taking a pic of it)
It is a personal tissue holder, perfect for the winter/allergy season or anyone with little ones also!
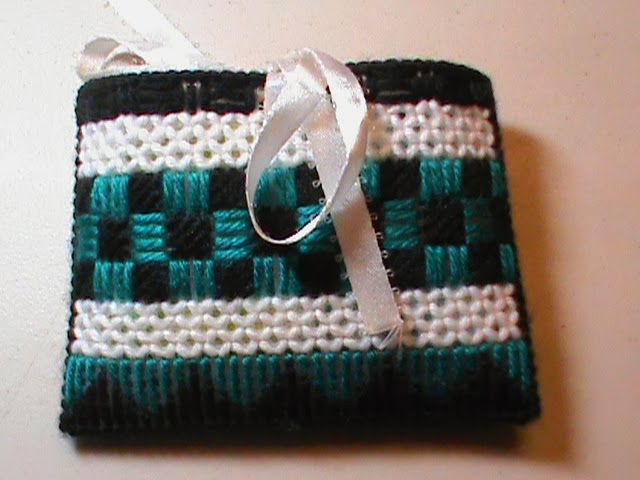
Inside one personal tissue pack will fit. It would be great for gift cards, candy hot cocoa, gloves, and other small goody packs! I love these they slide in and out of your purse with ease! Love them I have made them every year (like 10 years) and they always sell out!

They are perfect stocking stuffers. I love making these each one I do different, there are so many stitches and color combos.
I do take custom orders if you are interested!
(otherwise if you are familiar with plastic canvas the dimensions are height 25 holes length 35 holes the second and third lines down 16 holes in from both sides cut so three spaces open.)
Hope you like them!
Saturday, November 30, 2013
Some paper ornaments
Here are a few of the ornaments I made. I was inspired by Cynthia who is the scrsppybookworm on YT. I have also made a video on these so please feel free to head to my YT channel.
I made four of each.

Here are the green ones all were made from paper scraps I am doing very good at depleting my scrsp bin! I added a stamped image to the center and a leaf I had left over from other projects.

Here on these which I call my red ones I added a red floer with a snowflake die cut and a circle folded up and a tile from Erica on top. Love it!

Here is my blue ones and I love these I added a blue and white flower a stamped image and two layered snowflakes with glitter. I think these are my fave.

I have hole punched them all and threaded an organza ribbon through each for hanging! Hope you all like them!
Saturday, November 23, 2013
Adult Cartoon drawing its ok its PG lol
I made this picture on poster paper so yes this is a big project. I drew all the images and then inked it and colored it with prisma color pencils. The colored part is the cartoon part what you would expect in a kids book the realistic part is the adult part once you put them together you get a fantasy image that both kids and adults can enjoy.
This was a work of love...that is all I can say lol
I hand stipled, hatched and cross hatched each and every piece. the uncolored portion is from sight I had the plants in front of me while I drew them, the characters were from memory that I have seen before but drawn from memory.
I really need to get a frame for this so I can hang it, but for now it will return to my drawing case.

Close up of the top!

Close up of the bottom!

I did a video on YT also.
Would love to hear what you think!
Happy crafting!
Saturday, November 16, 2013
Perspective and proportion picture
I have not completed this project yet and I'm not sure if I will...I stopped working on it and when I do that sometimes I lose the vision I was going for so if it ever comes back you may see this again just further along! lol
I hand draw all the images and shade them according to perspective and proportion. Here is the project as a whole. I love music and art and I can not have art with out music. Music can be with out art but there are few times my mind is not on art.
Here I combined them! First you pick your vanishing point and all items that are angular will be drawn from rays from the vanishing point. Items like the little creature on the lower right has it's own perspective so it has it's own vanishing point. Art can be confusing but beautiful and easy to those who understand the techniques.
I am done with technical terms sorry guys...lol

This is the explosion (vanishing point) I picked an explosion because in my mind creativity is an explosion! it flies out in all directions, sometimes wreaking havoc...like messing up our craft rooms lol

this is an eraser which is one that I like to use, second only to my kneaded one!

This is a prism with spray and a bottle cap.

This is a broken ruler, this is drawn to scale so you can measure with it.

flying pig...another nod to Pink Floyd.

turpintine bottle...yep the culprit that started this explosion! lol not finished with this one yet, but it is what it is.

The melting shrap metal clock a nod to Pink, Floyd Alice in wonderland, and Dali. I love how this came out.

Would love to hear what you think!
Happy crafting!
Thursday, November 14, 2013
Water color picture i made
This was a fun project! I made this on water color paper.
First you pick three colors and water color on a wash (wet paper) leaving some white showing no rhyme or reason just spread on some paint then sprinkle salt here and there. (dots in the paint) the salt actually repels the water colors. (must use good quality water colors for it to work well).
once the paper is dry usually overnight. You draw on your images, try to make them flow as if one design not separate ones. (make them grow from one another) Make sure that they are the same subject coming from within you. mine are dragons and myself each is a different type of dragon. The wyrm or baby from present day, the second is the medieval dragon of past and then the tribal dragon of the ancients. They are also from different cultures. But I will not go into that. lol
Sorry I'm sure you don't want a cultural, art and history lesson lol.
Next you ink the image and color them but not completely you want the water color to show through so it is like almost a thought or wispy dream like. Best way I can explain it.
I drew in with my Pitt pens some black and gray flames licking up from the base of the photo, like a burning passion. All art speaks what does this say to you?


Would love to hear your thoughts. Hope you like it!
Happy crafting!
Subscribe to:
Posts (Atom)